SSR Deep Dive for React Developers
Nadia Makarevich

In the previous articles, we learned the basics of performance metrics for measuring initial load, what CSR (Client-Side rendering) is, why it’s so popular, and how to record, read and interpret the performance Flame Chart. We also learned two of the most significant downsides of Client-Side Rendering: it negatively affects the initial load and doesn’t work in environments without JavaScript.
In this article, we’re going to focus on solving those downsides by introducing another rendering pattern called SSR (Server-Side Rendering) and its variations like pre-rendering and SSG (Static Site Generation). We’ll again have a Study Project, with the help of which we’ll implement the simplest pre-rendering for a beautiful website, take a look at the cost of it and what it solves, then implement a proper SSR for it, measure its performance impact, talk about the cost of SSR, and finish with a quick implementation of SSG for the website.
Going to be exciting!
Why no-JavaScript environments are so important
Let’s start with no-JavaScript environments. This might be the most puzzling downside. Who disables JavaScript these days in their browser? It’s enabled by default everywhere, pretty much nothing will work without it, and most people won’t even know what JavaScript is to disable it anyway. Right?
The answer here is in the word “people.” Or, more precisely, in the fact that the real people are not the only ones who can access your website. Two major players in this area are:
- Search engine robots (crawlers), especially the Google crawler.
- Various social media and messengers “preview” functionality.
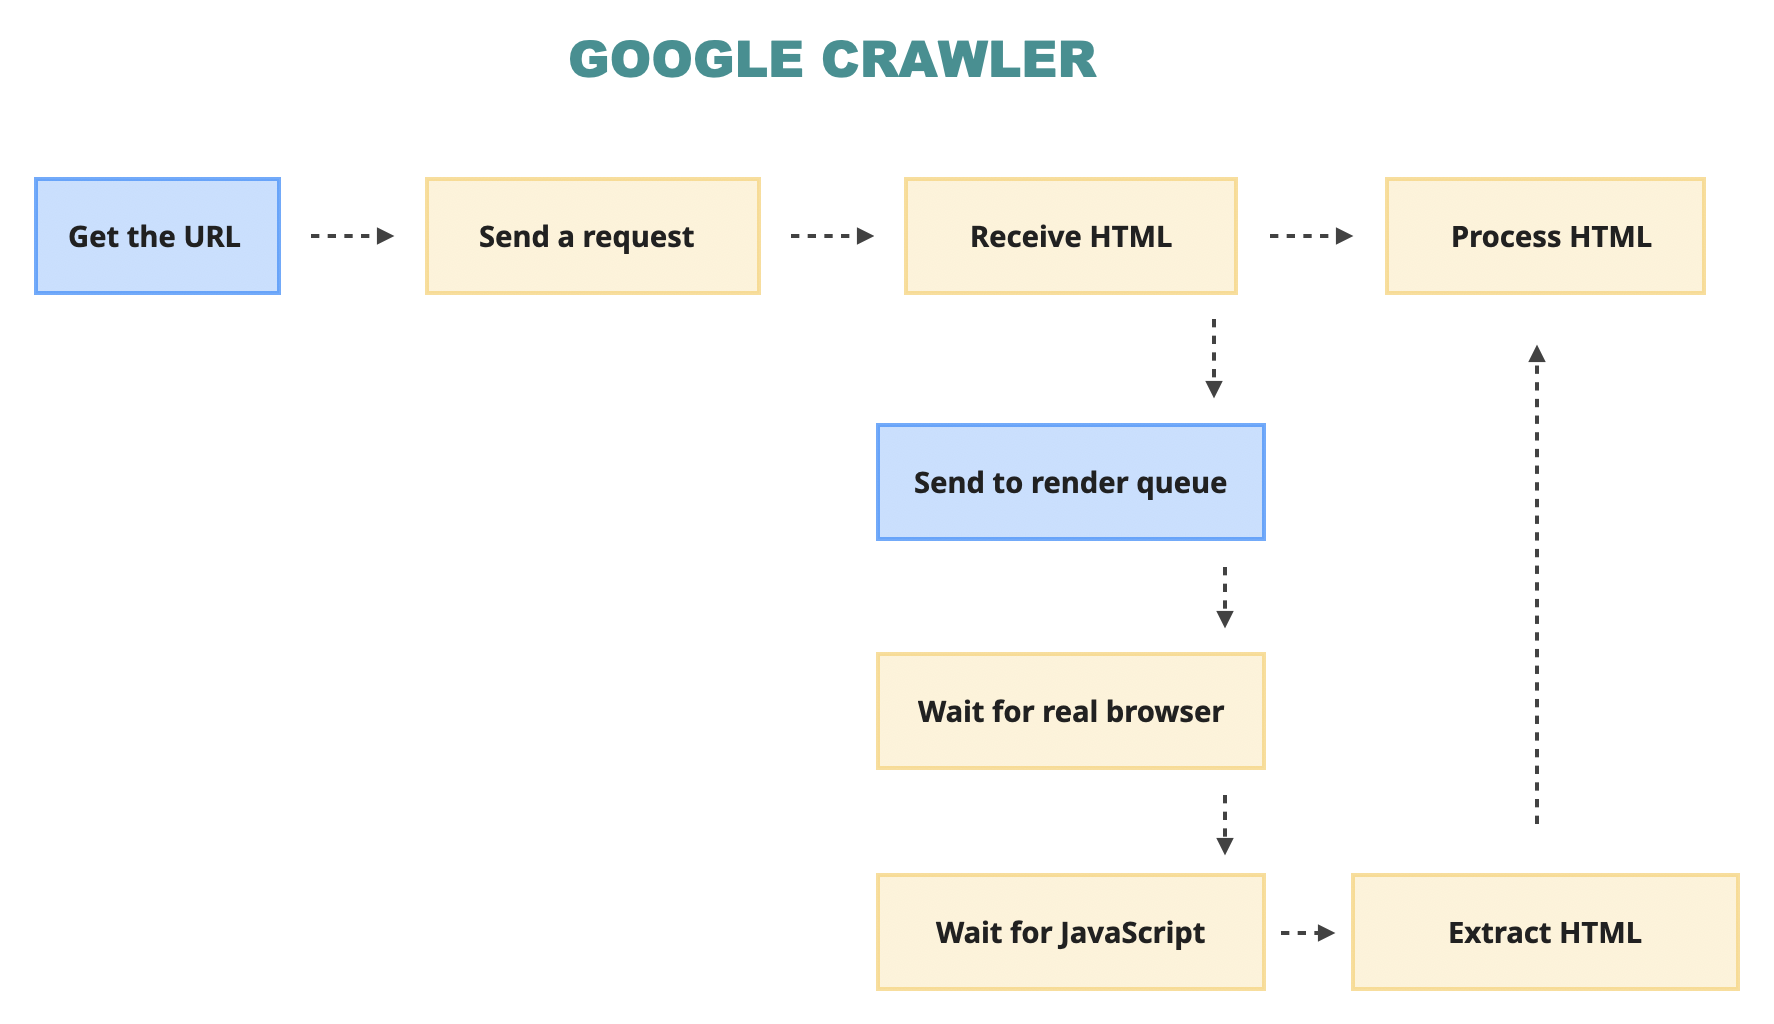
All of them work in a similar manner. First, they somehow get the URL to your website’s page. This usually happens either when a user tries to share a link to your page with their social media friends. Or when a search bot mindlessly crawls through the millions and millions of publicly available pages online. That’s why they are called crawlers btw.
Second, the bots send the request to the server and receive the HTML - just like the browser does at the very beginning.
Third, from that HTML, they extract the information they came for and process it. Search engines extract stuff like text, links, meta-tags, etc. Based on that, they form the search index, and the page becomes “googleable”. Social media previewers grab the meta-tags and create the nice preview we all have seen, with a large picture, title, and sometimes a short description.
And finally, fourth… Actually, there is no fourth sometimes. That’s it. No JavaScript, just pure HTML. Because rendering the page properly with JavaScript means the robots need to spin up an actual browser, load JavaScript, and wait for it to finish generating the page. Which is quite costly from the resource and time perspective. So not all of them can do it.

You can see it in action in the Study project. Download it and install dependencies:
npm install
Then build and start:
npm run buildnpm run start
Navigate between Home and Settings there. You should see that the title of the page changes with navigation. “Study project: Home” for the home page and “Study project: Settings” for settings.
This title is injected with React with a simple code like this:
useEffect(() => {updateTitle('Study project: Home');}, []);
Where inside, it’s just this:
export const updateTitle = (text: string) => {document.title = text;};
However, you also should see that it briefly “flashes” when initially loaded - that’s because the default title is “Vite + React + TS”: this is the title I have in index.html, and as a result, this is the title I receive from the server.
Now, expose the website to the outside world with ngrok (or a similar tool if you have it):
ngrok http 3000
Any try to post the URL it generates for you on the social media of your choosing. In the generated preview, you’ll see the old “Vite + React + TS” title. No JavaScript was loaded.
Although, this is not entirely true for some of the bots. Most of the popular search engines do wait for JavaScript. Google, for example, has a two-step process where it parses the “pure” HTML and also puts the page into a “render” queue, where it actually spins up a browser, loads the website there, waits for JavaScript rendering, and extracts everything it can again.
However, this process means that the indexing of a website that relies heavily on JavaScript might be “slower and budgeted”.
So if for your website it’s:
- Mission-critical to be discoverable by as many search engines as possible as fast as possible.
- It’s crucial to be shareable on social media platforms and to look good in the process.
Then it’s very important for the server to return the “proper” HTML with all the critical information on the very first request. Typical examples of such websites are:
- Read-first websites, i.e., various forms of blogs, documentation, knowledge base, forums, Q&A websites, news outlets, etc.
- Various forms of e-commerce websites.
- Landing pages.
- And so on - pretty much everything that you can search for on the World Wide Web.
That means that the “classic” client-side rendered SPA, with its empty div as the first HTML response, is a bad idea here.
It doesn’t mean, however, that we need to throw away React in anger. There are a few solutions we can try first.
Server pre-rendering
For this one, we’d need to introduce a server into the equation. Right now, in the study project, it looks like this:
app.get('/*', async (c) => {const html = fs.readFileSync(path.join(dist, 'index.html')).toString();return c.html(html);});
When the server receives any request, it just reads the index.html file that the build step generated for us in advance, converts it into a string, and sends it back to whoever requested it. It’s basically what all hosting platforms that support SPA will do for you. It’s just not something we directly control or modify with platforms like this.
However, to fix the “no-JavaScript” problem, we need to modify the server now. Fortunately, not much. The fact that it’s just a string we’re working with, simplifies matters a lot. Because nothing stops us from modifying this string before sending it back. Let’s find the existing title and replace it with “Study project,” for example:
app.get('/*', async (c) => {const html = fs.readFileSync(path.join(dist, 'index.html')).toString();const modifiedHTML = html.replace('<title>Vite + React + TS</title>',`<title>Study project</title>`,);return c.html(html);});
That’s slightly better, but in real life, the title should change for every page: there's no point in keeping it static like this. Luckily, each server always knows exactly where the request is coming from. For the framework that I’m using (Hono), it’s a matter of asking for c.req.path to extract it.
After that, we can generate different titles based on that path:
app.get('/*', async (c) => {const html = fs.readFileSync(path.join(dist, 'index.html')).toString();const title = getTitleFromPath(pathname);const modifiedHTML = html.replace('<title>Vite + React + TS</title>',`<title>${title}</title>`,);return c.html(html);});
Where in getTitleFromPath we can do something like this:
const getTitleFromPath = (pathname: string) => {let title = 'Study project';if (pathname.startsWith('/settings')) {title = 'Study project: Settings';} else if (pathname === '/login') {title = 'Study project: Login';}return title;};
In real life, this might need to be co-located with the actual pages or even extracted from the page code itself - otherwise, it will go out of sync with them almost immediately. But for the study project, this will do just fine.
One last thing to make it pretty: in the index.html file, we can replace the original title <title>Vite + React + TS</title> with something like <title>{{title}}</title> and turn it into a template.
<html lang="en"><head><title>{{ title }}</title></head>...</html>;// on the server then do this instead:const modifiedHTML = html.replace('{{title}}', title);
In the future, we can convert it into any of the templating languages if there is a need.
And, of course, we’re not limited by only the title tag - we can pre-render all the information in <head> like this. This gives us a relatively easy and cheap way to solve the “no-JavaScript” problem for social media preview functionality. They usually don’t need more. Most of them rely on the Open Graph protocol, which is just a bunch of <meta> tags with information.
We can even pre-render the entire page, not only meta-tags! But that one we’ll cover in the separate SSR block below, there are many more things to learn there.
In
backendreplace the contents of theindexfile with the content ofbackend/pre-rendering-index.tsIn
src/index.htmlreplace the contents of thetitletag with{{ title }}Refactor both the frontend and backend code to support the required meta-tags for social media sharing (see the list here)
Build the project, expose it via
ngrokagain, and try to share each page (login, home, settings) on the social media of your choosing. The preview should work properly now and show the details of each page.Bonus question: How would you refactor the project so that the meta-tag information is not duplicated between the Client and the Server?
The cost of server pre-rendering
I mentioned above that the meta-tags prerendering is relatively cheap. What exactly does this mean, though? How cheap, especially compared to the price and effort before introducing it?
Unfortunately, there is no good news compared to the completely static SPA. By adding a simple pre-rendering script, I introduced two problems other than the obvious increase in complexity that I now have to deal with.
Where to deploy?
The very first problem is, where should I deploy the app now? Before the change, I could keep the hosting cost at zero for a very long time - hosting static resources is extremely cheap these days. Now, I need to have a server. And those usually ain’t cheap.
There are two most common solutions here.
We can use the serverless functions of the hosting provider that serve the static resources: Cloudflare Workers, Netlify Functions, Vercel Functions, Amazon Lambdas, etc. Most of the static resource hosting providers probably have them in one form or another.
The advantage here is we still don’t need to think about the server and its maintenance. Those Cloud Functions are like mini-servers that the provider deals with for us. Our job is to write code, and it magically Just Works. Everything else is their concern. For study projects, some niche projects, projects at the very beginning of their journey, and those that don’t have a viral nature built-in, cloud functions will be the optimal choice.
Cloud functions are usually very easy to configure and deploy, they are priced per usage, and the usage comes from actually hitting the endpoint. There is no chance of incurring an unexpected bill here by accidentally leaving the container running over the weekend.
The downside is the “price per usage” part. The more popular the website is, the more chances that the usage will exceed the limits. I read a few horror stories where a project became popular on HackerNews or TikTok, suddenly got a few million visitors instead of the regular hundred, and the owner woke up to a surprise $5000 bill. So, setting spending limits, monitoring spending closely, and having a plan for what to do in this situation are crucial when it comes to serverless solutions.
If serverless functions are not your choice, you can just keep it as an actual tiny node (or anything else) server and deploy it to any cloud platform, from AWS to Azure to Digital Ocean to [insert your favorite hosting provider].
This solution has its advantages. Everything is under your control. Migrating from one solution to another won’t require code changes, as opposed to serverless functions, which are vendor-locking you a bit. Prices are usually much more predictable, much simpler, and much lower when the usage increases. Also, you can use whatever tech stack you want, whereas serverless functions are usually very limited.
The disadvantages are exactly the same as the advantages. Everything is up to you now. You need to monitor CPU/memory usage. Worry about observability. Worry about scaling. Memory leaks will keep you up at night.
And you’ll have to worry about geographic regions. Which leads me to the second problem that arises with introducing any kind of server to a previously pure SPA app.
Performance impact of having a server
Remember the Initial Load article and the impact of latency and CDN on initial load performance? By introducing even a rudimentary server that only pre-renders meta-tags, I’m introducing a mandatory non-cached unavoidable round-trip to the server for every initial load request, regardless of whether the user is new or repeating.
I just made the initial load performance of an SPA app, which was never great to begin with, slightly worse. And how much worse will depend a lot on where exactly the server is deployed.
If it’s deployed as one of the Serverless Functions, then there is a chance that it's not that bad. Some of the providers can run those functions “on Edge.” I.e., those functions are distributed to different servers that are closer to the end user. Pretty much the same as CDN for static resources. In this case, the latency will be minimal, and the performance degradation will be minimal.
If, however, I went with the self-managed server, I don’t have the advantages of a distributed network. I’d have to deploy it to one particular region. So, users on the opposite side of the planet from this region have a chance to really feel the impact of the performance degradation.

If this performance impact is critical, you’d have to deal with it somehow. Prepare yourself for complicated caching strategies, deployments to different regions, etc. Basically, it’s not a simple no-server frontend app anymore. It’s a full-stack or even backend-first app now.
Next.js on Vercel/Netlify
A question that immediately might pop into mind: “I’m just writing my frontend with Next.js and deploying it to Vercel/Netlify. Do I really need to know any of this?”
The answer here is, “Unfortunately, yes, you can’t escape it.” Because, that’s exactly what those Next.js-first hosting providers do by default: they convert your app into JavaScript files and a bunch of small Serverless Functions. It’s just happening without your control or even knowing about it.
So unless you’ve explicitly set up your Next.js project to export as “static,” everything in “The cost of server pre-rendering” applies.
If you have a Next.js app that is “natively” deployed (i.e. 1-click deployment) to some serverless platform like Vercel/Netlify, try to find how many functions were created for it.
Are those “edge” functions or normal functions? Can you find out how usage is calculated for them? How many visitors can your website handle before you’re over the limit?
If you have a combination of “normal” and “edge” functions - can you map out which function is responsible for what, and what effect they have on your deployed project?
Pre-rendering the entire page on the server (SSR)
Let’s talk about pre-rendering some more. In the section above, we pre-rendered only meta-tags because it was easy just to replace an existing string with another string. But what stops us from messing around beyond the <head> tag? Let’s take a look at the contents of the <body> tag of our HTML page that is sent by the server:
<body><div id="root"></div><script type="module" src="./main.tsx"></script></body>
Remember how Client-Side rendering works? When the scripts are downloaded and processed, React takes the “root” element and appends the generated DOM elements to it. So what would happen if, instead of the empty div, I returned a div with some content inside? Let’s make it a big red block:
<div id="root"><div style="background:red;width:100px;height:100px;">Big Red Block</div></div>
Try adding it to the index.html, build the project, start it, and don’t forget to disable the cache and slow down the CPU and Network for better visibility.
When you refresh the page, you should see the momentary flash of the Big Red Block, which is replaced by the normal dashboard page. The first great news is that the red block didn’t stick around - obviously, React clears the “root” div before inserting anything inside. Or overrides the existing children, doesn’t matter for this article.
The second great news comes from staring at the performance graph. Record it now. The result should be something like this:
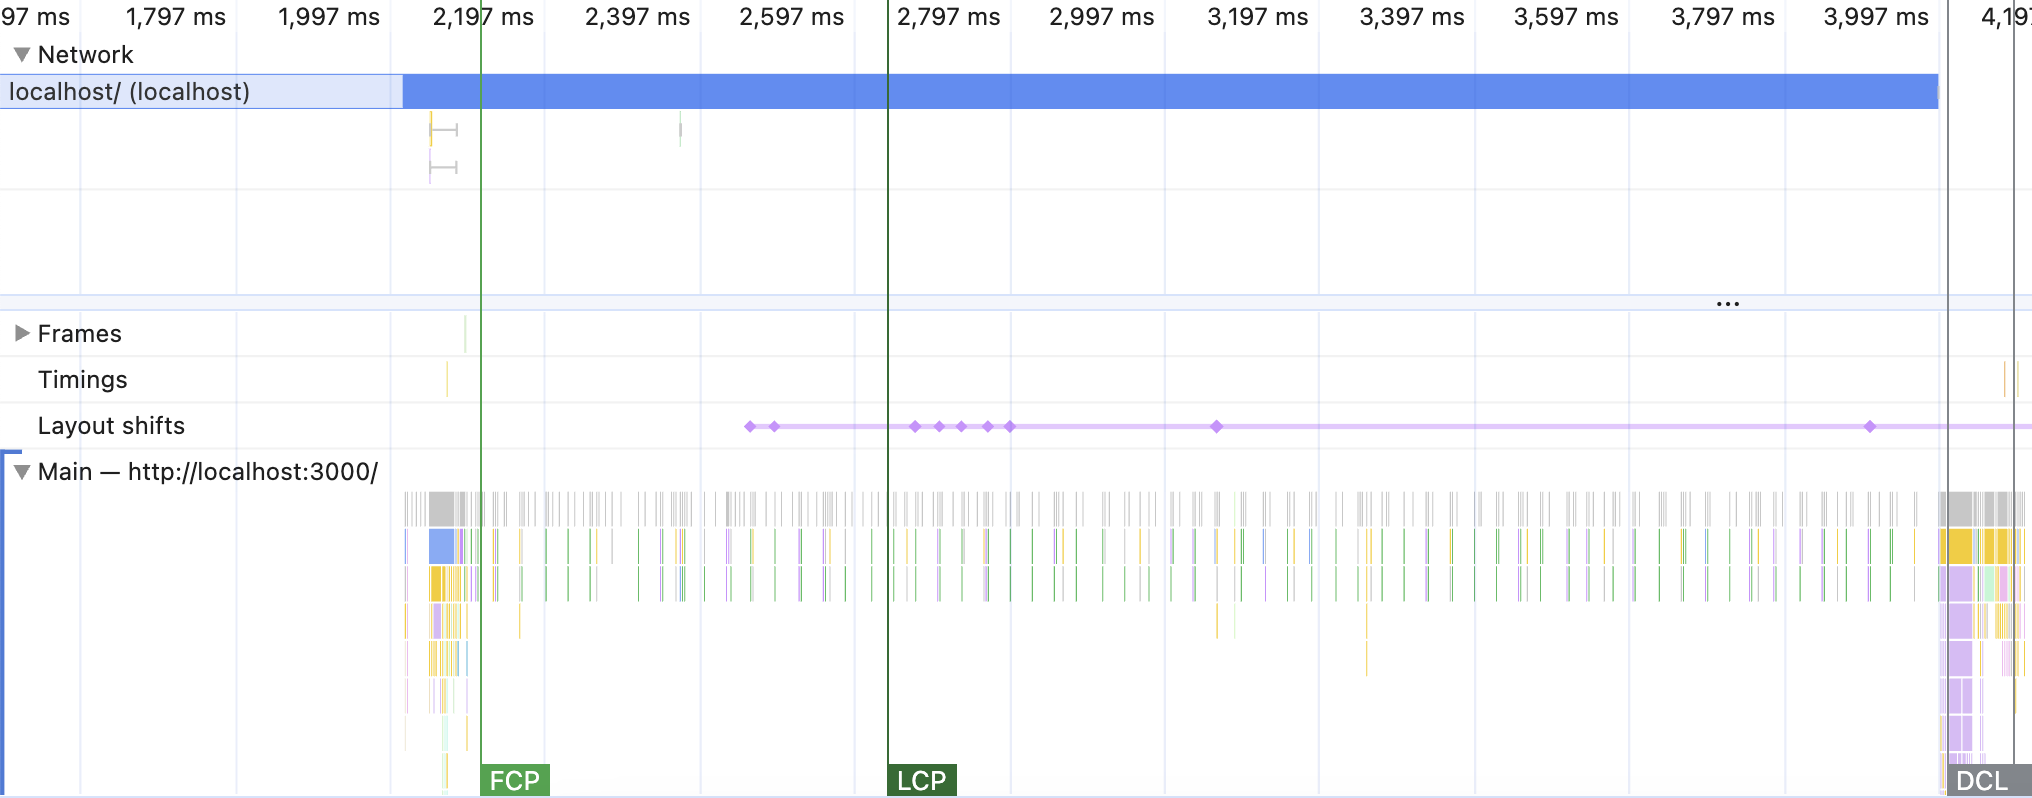
Pay special attention to the order of things and timing here.
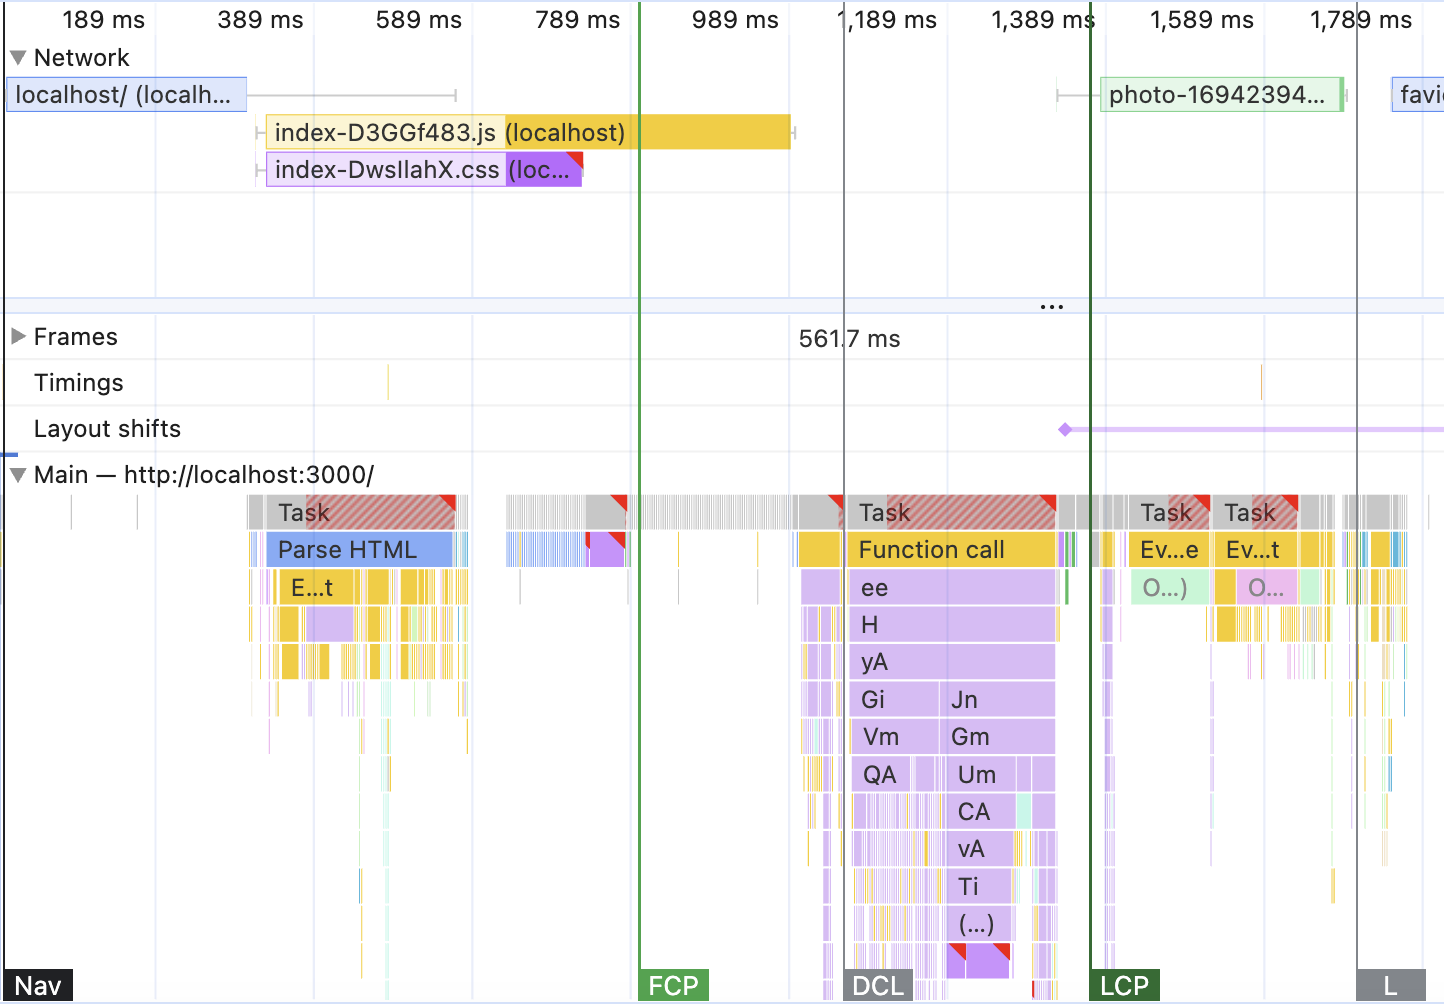
In the beginning, it looks exactly like the graphs we’ve seen before. First, waiting for HTML from the server which results in a blue HTML parsing block in the “main” section. That one triggered the download of CSS and JavaScript (yellow and purple blocks in “Network”) at some point.
But after the CSS was done downloading, different things started happening. First, we see a somewhat longer block of purple “Layout” (same level as the blue HTML block). That didn’t happen before! Almost immediately after it was done, the FCP (First Contentful Paint) was triggered. But the JavaScript bar at the top is still loading! After that, things continue as usual - JavaScript finishes loading, it’s processed, painted, and then LCP (Large Contentful Paint) is triggered.
If you hover over the very top section, where the screenshots of the frames appear, you’ll see that the gap between FCP and LCP is exactly the period when our Big Red Block was present on the page. The gap between the FCP and LCP for me is around 500ms, with FCP around 800ms and LCP around 1.3s.
Looks like this 500ms is pretty much the cost of Client-Side rendering for the initial load. This is huge! If I somehow manage to shave off those 500ms from LCP, that’s a 40% improvement! I might get a promotion for this.
Fortunately, everything is possible. React gives us a few methods that can pre-render the entire app and which we can theoretically use here. For example, there is “renderToString.” It can render our app into a string, according to the documentation:
const App = () => <div>React app</div>;// somewhere on the serverconst html = renderToString(<App />); // the output will be <div>React app</div>
Since we’re already dealing with strings on the server, this seems perfect. All that I’d need to do is to replace the empty “root” div with the output of this function. Exactly the same as we did for meta-tags. Let’s try?
Go to the backend/index.ts and clean it up from any modification we did above. Find the commented-out code:
// return c.html(preRenderApp(html));
And uncomment it. Re-record the performance again. The end result should be something like this:
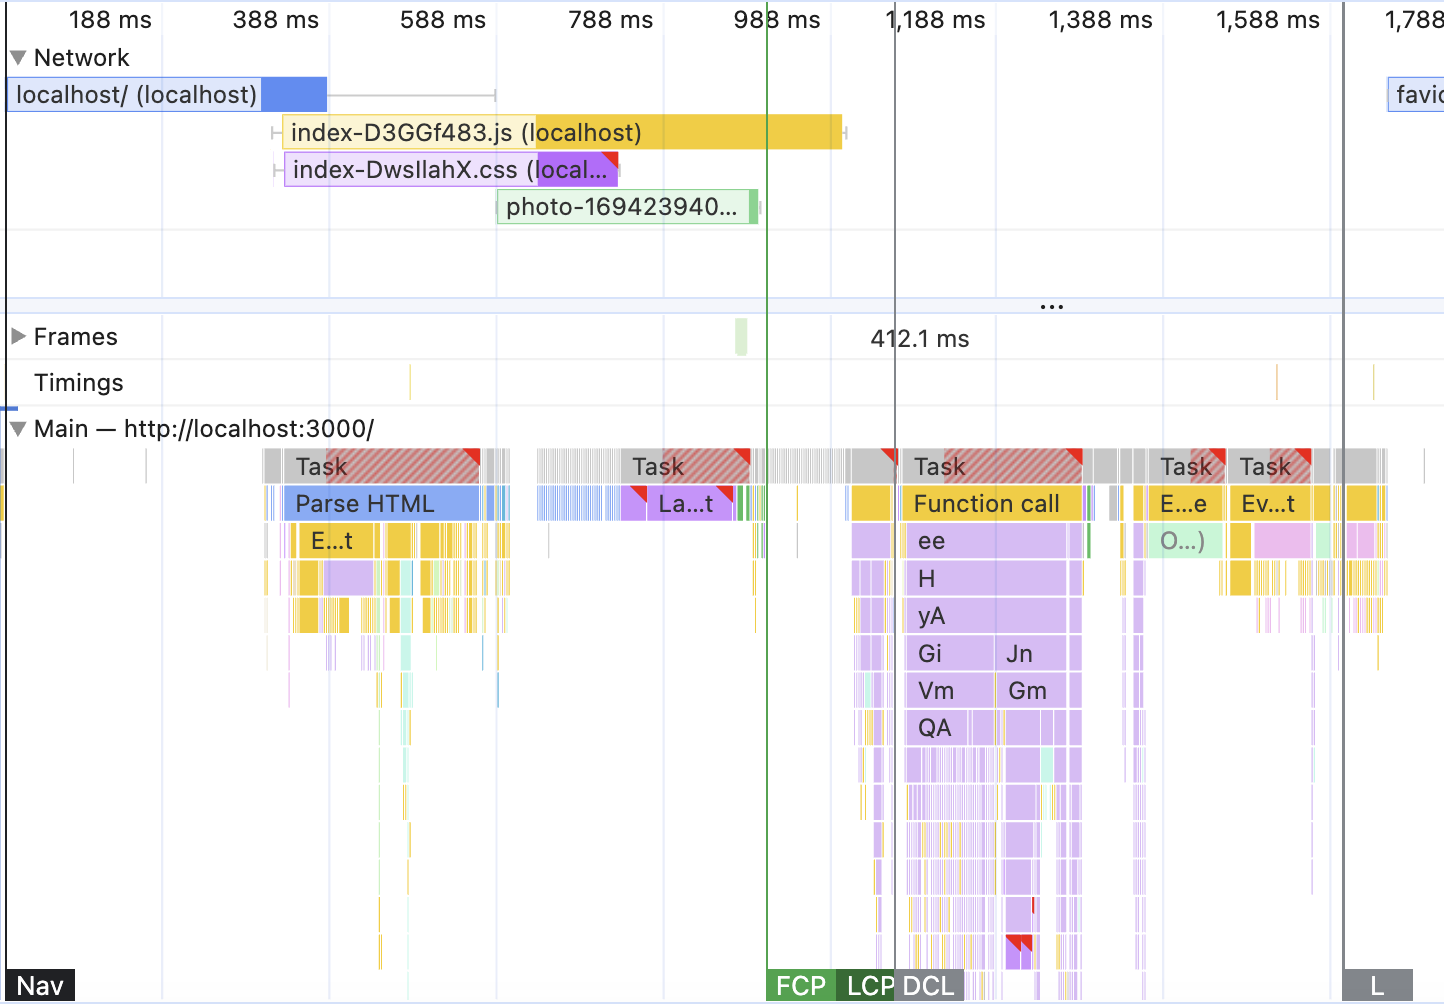
The difference is immediately visible: FCP and LCP happened at the same time. Before the main React-produced JavaScript was triggered and even before JavaScript finished loading. That means that content pre-rendering is working! 🎉 Happy days ☀️☺️. Hover over the screenshots at the very top to verify that it is indeed the beautiful dashboard that showed up then, not some random fluctuation.
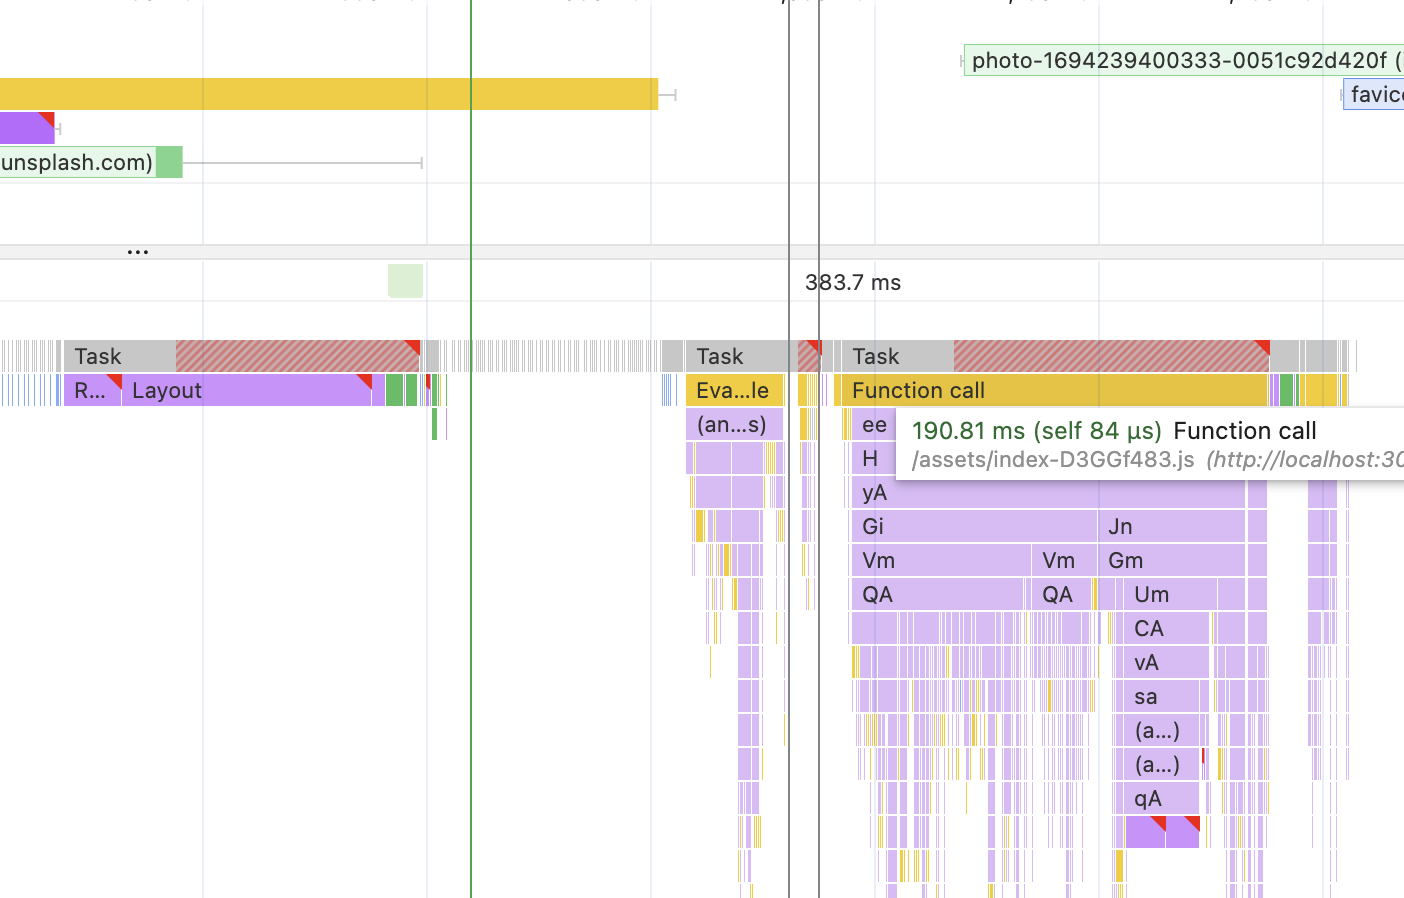
There is, however, a tiny abnormality - the FCP is triggered later than I promised. I was hoping to see it at 800ms, but it is actually around 900ms. The recurring lesson in everything performance: never promise exact numbers in advance 😅. But where did I lose 100ms?
First of all, look at the very top left corner, the “Network” section, where we have the initial request to the server. Notice the solid blue line there appearing? This is our HTML content downloading. We’re sending many more elements now, not just a simple empty <div>. Hover over that block to see the exact numbers - around a third of the missing 100ms is spent on downloading the content.
Also, pay attention to the purple “Layout” block after the “Parse HTML” task. It looks much longer, isn’t it? Hover over it again for the exact numbers - and here’s your missing two-thirds of the 100ms. The browser needed not only to download some extra HTML but also to calculate the positions of many more elements before painting them.
Hence the missing time. But still worth it, isn’t it? I shredded 400ms from the LCP timing and improved initial load performance by 30%! And here’s another cool part: disable JavaScript now and refresh the page. The dashboard is still there! And even links work, although they cause the full reload.
This part is what makes SSR worthwhile. Now, every search engine and every other robot that you want to give access to your page will see everything without loading any JavaScript. Performance improvement here is a nice bonus. And an unstable one at that.
SSR can make initial load worse
Unstable, because there are no silver bullets in performance. If someone tells you SSR will a 100% increase the initial load of your SPA app, they are mistaken. Now that you know how network conditions, Client-Side and Server-Side rendering work, can you think of a scenario when SSR worsens LCP?
Here’s how.
Disable the CPU throttling, let your machine be fast again. Set Networking to the slowest possible simulation. For me, default Chrome 3G does the trick, but you might need to go slower - it will depend on how fast your machine is. Uncheck the “disabled cache” checkbox. I want those CSS/JS files to be served from the browser memory.
Now, measure the LCP with and without pre-rendering.
For me, the results are like this. Without pre-rendering, the “SPA” mode, the LCP is around 2.13 seconds. With pre-rendering, the “SSR” mode it’s around 2.62 seconds. Almost 500ms longer!
The performance charts are a fascinating read for this situation as well. The “SPA” mode looks like this:
At first, there is a loooong block (2 seconds) of waiting for the server’s response in the Network section. That’s the latency of the slow network connection. Then, almost instantaneous access to JavaScript and CSS resources: they come from the browser cache, no network. Plus, almost instantaneous download of the HTML content - it’s just an empty div. Then, the regular and quite fast, since the CPU is not slowed down, JavaScript execution. That’s our React generating the page. And finally, the page is visible.
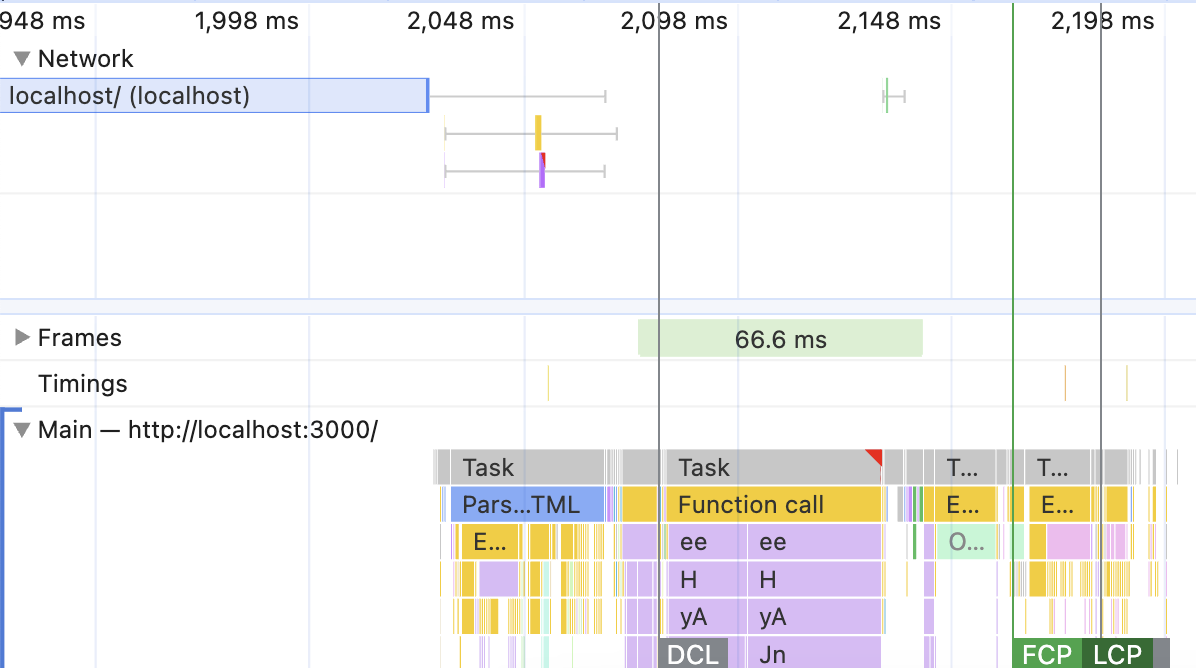
Now, the same Network/CPU conditions with the SSR mode enabled:
Same initial waiting time - latency never went away. Then, HTML starts downloading. But since now we have a lot of it, the download now takes a looooooong time - the bandwidth is very reduced.
Then the most fascinating part: while the content is downloading, I see spikes of activity in the Main section. Enlarge and hover over them - it will be mostly Layout tasks. The browser already has CSS and JavaScript downloaded (from the cache), so it has all the necessary information to paint the layout as soon as it gets small pieces of it. And it does.
You should be able to actually see the gradual build-up of the interface on the page: first, the sidebar shows up, then the top nav, then the top charts, then the table. All of this is in the order of the HTML that is coming through slowly. If this is not cool, I don’t know what is.
While this example feels like a weird edge case, it’s actually not. The combination of a slow network + huge latency + fast laptop happens quite often for business travelers, for example. Or wildlife photographers. Or travel bloggers. Or engineers sent to remote locations. So if your app is targeting that specific niche primarily, and your app is already SPA, trying to introduce SSR to it might make it worse.
Or it might not, of course. It will depend on the size of the HTML that is downloaded, how fast the devices actually are, and how much JavaScript the app needs to render. Essentially, it all comes down to two things: knowing your customers and measuring, measuring, measuring everything.
SSR and hydration
In all this excitement about showing the content sooner, we forgot to investigate what happens after the content is loaded.
Remember the Big Red Block behavior? After React has loaded and generated its own elements, it completely replaced the content of the “root” div and everything inside, including the Big Red Block. But what happens when, instead of the weird red block, I send the actual HTML of the future page?
Actually nothing. I haven’t told React in any way that this content is important, so it will behave in exactly the same way: clear the entire content of the “root” div and replace it with its own. It just happens to be exactly the same content from the HTML perspective, so we don’t see the difference with the naked eye.
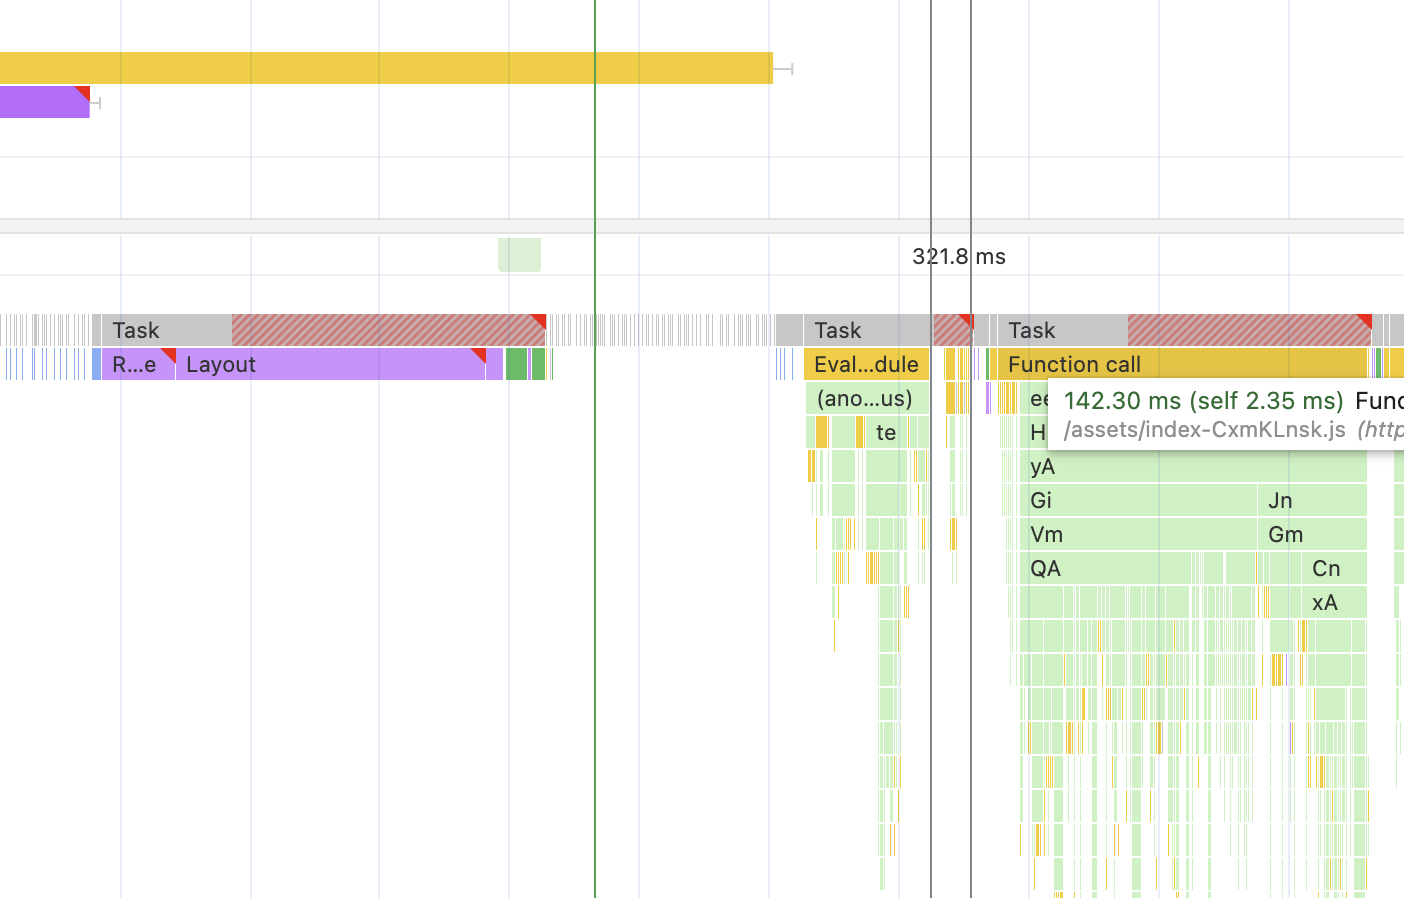
But we can see it in the performance profile. Slow down the CPU and Network to make the behavior slightly more visible and re-record the performance for the SSR example. Pay attention to what is happening after the CSS and JavaScript received:
On the top left, I have the network section, where the resources are finished downloading. Almost immediately after the CSS is received, I see a large purple “Layout” section below - that’s when our SSR’d content shows up. After the JavaScript yellow block on the top left finished loading, React kicks in. The somewhat longer task (180ms) is when React builds the UI. At the very bottom right, I again see a small-ish Layout block.
This is a typical picture of the Client-Side Rendering that we’ve seen many times already. This is when React clears the “root” div and injects whatever it generates instead. And also, it’s completely unnecessary. React already has all the DOM elements present, it could’ve just reused them instead. Surely, it should be faster.
This is when what is known as “hydration” comes in. “Hydration” does exactly what I wished for above - it shows React that there is already HTML on the page that matches exactly the HTML it will generate. So React can just re-use the existing DOM nodes, add event listeners to them, prepare whatever it needs internally for future functionality and call it a day. No unnecessary mounting components from scratch!
Hydration in React is actually very simple to implement, for once: it’s just one function call. All we need to do is to replace the createRoot entry point with this:
hydrateRoot(document.getElementById('root')!,<StrictMode><App /></StrictMode>,);
You can find this code in src/main.tsx - comment out the createRoot part and uncomment the hydration part. Then re-build and re-start the project:
npm run buildnpm run start
Measure the performance again:
There is no more purple stuff in the React-related JavaScript execution. And it’s slightly faster now - 142 ms instead of 180. This might not seem as much now, especially considering that LCP was triggered before. But it’s not always going to stay like this.
Try, for example, unchecking the “disable network cache” and removing Network throttling while keeping the CPU down. Emulating repeated visitors with fast internet but slow devices. For me, without hydration, it separates FCP from LCP and pushes the LCP beyond the JavaScript task at the very end. LCP, in this case, is around 550ms. With hydration enabled, LCP moves closer to FCP and hovers around 280ms, right at the beginning of the JavaScript task.
There is also a matter of blocking the main thread and reducing it as much as possible, which Hydration helps with. Also, Hydration is not only about JavaScript listeners. It also allows fetching and injecting some initial data into the app - so we can avoid loading spinners or flashes of content. But about that, maybe in another article in the future.
Should I implement SSR like this?
Now that it seems obvious that SSR might be very, very useful for certain cases, and implementing it seems kinda trivial, the question might arise: can I just use the code from the study project and implement my own SSR?
The answer will be very rare for this blog: absolutely not! This solution is fine for study purposes, to explore how pre-rendered content behaves from different perspectives while turning on and off one thing.
But it’s actually not trivial at all. I hid half of the things I had to do to make it work. Half of the things have not been implemented yet. It’s a very basic and almost deprecated version on the backend that doesn’t support the latest React features.
First of all, there is no SSR for the dev server here. So, there is no way to debug the SSR other than constantly re-building the project. That’s half the reason you had to re-build it all the time to apply changes, by the way. (The other half is because performance should always be measured on the production build, so I don’t feel particularly guilty about it).
If you want nice things like hot reload, then you have to implement it by yourself. There is a whole large set of instructions on how to integrate SSR with Vite properly. And that’s Vite, for Webpack it will be very different and likely not very well documented. For something more exotic, I don’t even know where to start.
Second, the pretty string const html = renderToString(<App />); that I showed from the React docs is a myth and is never actually going to work. The problem here is this part - <App />. This is JSX, it’s how we write React code most of the time, so it seems so normal now. But the only reason why it works is because your build system has a transformation step that is likely (or maybe not, it always depends) powered by Babel. “Pure” node or any other server framework won’t support it.
Look into backend/pre-render.ts to see how it’s actually implemented.
First, I extracted the transformed App code from Vite itself:
const { default: App } = await vite.ssrLoadModule('@/App');
If you’re on Webpack, you’ll likely need to manually configure and register Babel plugins for that. So, even the very first step would mean you need to have an understanding of what is happening here and how to implement it for your app.
The second step, the actual renderToString:
const reactHtml = renderToString(React.createElement(App, { ssrPath: path }));
Still doesn’t look like the docs - JSX support for the actual backend file is not the same as extracting it from Vite. Although, if you read the docs, you’ll notice that renderToString doesn’t support streaming and waiting for data.
So, to actually implement proper SSR, you’d need to understand whether you need those new features in your app or not. And if yes, how to implement them on the backend. There is some documentation for the recommended method and also a few discussion threads on Github on the topic, so at least it’s a start.
But it’s a lot of work, the things mentioned are just the beginning, and before you know it, you’re three months behind on the project and basically implementing your own Next.js. Why do you think there aren’t that many competitors to it?
So, unless there is a very valid business reason and a lot of support in terms of time, resources, and expertise for this, it might be easier just to use an already existing SSR framework. Especially considering that the backend part here is only one piece of the puzzle. There is also a lot of complexity involved on the front side.
SSR and frontend
Depending on the size of the app and how optimized it is for SSR, it actually might be even more complicated than the backend part. Yep, you heard me right, that’s another thing I hid from you while implementing the SSR above: we actually need to make changes to our frontend code as well.
Browser API and SSR
Remember how I got the HTML that is sent to the browser? I just generated a string with React’s renderToString and then injected that string into another string. There was no browser in the vicinity of this process and never will be.
So, what do you think will happen to all the calls to the browser variables that we so used to on the frontend? All those window.location and window.history and document.getElementById? Nothing good. window, document, etc., will turn into undefined. There is no browser that can inject them into the global scope.
So the second React tries to call a function (i.e., render a component) that tries to access them directly, it will fail with the window is not defined error. The entire app will just explode. Not just explode. The server part will explode, which is even worse - there won’t be any chance for the frontend part to catch the error and show some pretty screen with “we’re working on it, here’s a cookie.” Error handling would need to be handled on the server, and you’d have to have a special “server” error screen.
Try to add a simple
console.info(window.location);to any part of the frontend code, for example, here:src/App.tsxRe-build the app with
npm run buildand re-start itYou should see the
Internal Server Errorstring on the screen- Can you come up with a way to fix it?
A typical way to fix it would be to check whether the window (and all others) global variable is declared before trying to access it:
if (typeof window !== 'undefined') {// do something when the global window API is available}
If you look at the code in frontend/utils/use-client-router.tsx, this is exactly what I had to do. And would have to do any time I need to access window, document, or anything else at runtime.
useEffect and SSR
And speaking of use-client-router file. If you look closely, you’ll see that I didn’t have to do that check for typeof window inside useEffect:
useEffect(() => {const handlePopState = () => {setPath(window.location.pathname);};window.addEventListener('popstate', handlePopState);return () =>window.removeEventListener('popstate', handlePopState);}, []);
It’s because when running on the server (i.e. via renderToString and friends), React doesn’t trigger useEffect. And useLayoutEffect, for that matter. Those hooks will be run only on the client after the hydration happens. Take a look at this short explanation and some lengthy discussion on the topic from the core React team members if you want more details on the reasoning for this behavior.
So it’s definitely something to keep in mind in case you’re expecting some UI changes as a result of useEffect - they will cause a “flash” of content when the JavaScript is loaded.
Conditional SSR rendering is a big no
Some parts of your code might have so many dependencies on the browser API that you might think it’s easier just to skip rendering that part entirely while in SSR mode. So the natural temptation would be to do something like this:
const Component = () => {// don't render anything while in SSR modeif (typeof window === "undefined") return null;// render stuff when the Client mode kicks inreturn ...}
Nope. That’s not going to work. Or, more precisely, it will. But it will confuse React - it will expect that the HTML produced by the “server” code is exactly the same as the HTML produced by the client code.
It will confuse it so much that it will just fall back to the Client-Side Rendering pattern - where it will erase the entire content of the “root” div and replace it with the freshly generated elements. It will behave like the hydration never happened, with all the downsides that come from that.
Try out this challenge:
- Somewhere in
frontend/pages/dashboard.tsx(or anywhere else you like) create aClientOnlyButtoncomponent with the code:
const ClientOnlyButton = () => {if (typeof window === 'undefined') return null;return <button>Button</button>;};
- Render it somewhere on the page.
- Re-build and re-start the project as usual.
- Record the performance profile. It should show the picture we saw when hydration was not implemented yet, with Layout blocks inside the React JavaScript task.
Disappeared hydration - if you’re lucky! Sometimes it can introduce really weird layouting bugs instead, so the website will look completely broken.
The correct way to do it is to rely on React’s lifecycle to “hide” the non-SSR compatible blocks. For this, we need to introduce state and track in it whether a component is mounted or not:
const Component = () => {// initially it's not mountedconst [isMounted, setIsMounted] = useState(false);};
Then flip this state into true when a component has been mounted, i.e. inside a useEffect:
const Component = () => {// initially it's not mountedconst [isMounted, setIsMounted] = useState(false);useEffect(() => {setIsMounted(true);}, []);};
Remember: useEffect doesn’t run on the server, so the state will turn true only when the client-side version of the website is fully initialized by React.
And finally, render what we wanted to render that is not SSR compatible:
const Component = () => {// initially it's not mountedconst [isMounted, setIsMounted] = useState(false);useEffect(() => {setIsMounted(true);}, []);// don't render anything while in SSR modeif (!isMounted) return null;// render stuff when the Client mode kicks inreturn ...}
Re-write the
ClientOnlyButtonfrom the previous exercise to work correctly with SSR.- Re-build and re-start the project as usual.
Record the performance profile. It should revert back to the SSRed look.
Third-party libraries
Not all of your external dependencies will be supportive of SSR. It’s always a gamble with the libraries. For some of them, you’ll be able to opt-out of the SSR using the solution above. Some of them will be rejected by the bundler, so you’d have to import them dynamically after the client-side JavaScript is loaded. Some of them you’d need to remove from the project and replace with a more SSR-friendly library.
This is going to be especially painful if the non-SSR-compatible library is something fundamental for the entire project. Like a state-management solution or a CSS-in-JS solution.
For example, try to use Material UI icons somewhere in the Study project:
// anywhere, for example in src/App.tsximport { Star } from '@mui/icons-material';function App() {// the rest of the code is the samereturn (<>...<Star /></>);}
Re-build it and start it - you should see that the SSR collapsed with:
[vite] (ssr) Error when evaluating SSR module @/App: deepmerge is not a function
Have fun figuring out how to fix it 😬
Static Site Generation (SSG)
Okay, let’s assume that we’re absolutely have to have “proper” server-rendered pages and we’re ready to deal with the consequences on the frontend for this. For example, we’re implementing a fancy “promo” website. Those obviously need to be indexed by all possible search engines as fast as possible and should be shareable via everything that can share a link. That’s the whole point of a website like this.
Let’s also assume that all the info on the website is “static”, i.e. there is no user-generated content, no permissions to take into account, no complicated data generation per request. The website is just a few pages that introduce the product, some standard pages like “Terms and Conditions”, and a blog that is updated once a week.
This situation is a rare use case when we can have our cake and eat it too. We already know that pre-rendering the website on the server is relatively easy. It’s just a matter of calling React.renderToString on our app (more or less).
So the big question here is: what stops us from running React.renderToString during build time, right after we run npm run build? In theory, we’re pre-rendering and sending a proper HTML page to the browser anyway. And the pre-rendered content is always the same. We probably can just do it in advance, save it as a bunch of actual HTML files, like in good old times, and save ourselves the pain of having a “proper” server. Right?
The answer: there is absolutely nothing that stops us from doing that. Try running this:
npm run build:ssg
It will first build our website the usual way with Vite, and then run a very primitive script (backend/generate-static-pages.ts) that replaces the empty <div id="root"></div> with the content generated by renderToString. Exactly what the server does. Only now do we not need the server anymore.
Take a look at the built files in the dist folder. You’ll see two additional files now: login.html and settings.html. Open any of the HTML files - you’ll see that <div id="root"> is filled with content.
This is our “static” website, that we can start with absolutely any webserver:
npx serve dist
Or upload it pretty much anywhere, same as any Client-Side Rendered app. Only this time it won’t have CSR downsides, all search engines will be able to index it properly right away, and social-media shares will work beautifully.
Static websites are so good that they even have their own three-letter abbreviation: SSG (Static Site Generation). And of course, there are plenty of frameworks that generate them for you, no need in manual labour: Next.js supports SSG, Gatsby is still pretty popular, lots of people love Docusaurus, Astro promises the best performance, and probably many more.
There is still a lot to say about SSR, the concepts here are just a foundation to build upon. But hopefully, it was useful and you’ll feel more confident next time you need to make a decision: should we start with SSR for our next website or not?
Table of Contents
Want to learn even more?

Web Performance Fundamentals
A Frontend Developer’s Guide to Profile and Optimize React Web Apps

Advanced React
Deep dives, investigations, performance patterns and techniques.
Advanced React Mini-Course
Free YouTube mini-course following first seven chapters of the Advanced React book